5 Stylish Search Boxes For Blogger (With Demo)

Search Box is the basic but a necessary part of a website. They're user convenient and help you in increasing your website usability. They help your readers to navigate throughout your blog more efficiently. You would see that every blogspot blogger has different stylish custom search box widget matching their template design because, they were not only help users to find the solution of their problems more easily but also add a professional look to your blog.
Whereas Web crawlers like Google can crawl your entire site easily to index all of your posts and pages, visitors have only access to the links that are in front of them. You may have hundreds or more posts/pages for people to read. You may have a different category, labels, tag, related posts, etc. listed on each of your pages, but you cannot provide all of your data in a single page. For people to find what they are looking for, they need to be able to search through your entire content quickly and easily.
Whichever page a visitor lands on, they can search for what they want. This allows people to get access to some of your hidden content that would take much longer to find by clicking through countless pages or posts. The easier it is for people to navigate your whole blog, the more likely they will stay and visit again as they can switch away to another, increasing your bounce rate.
Custom Search Boxes For Blogger
Just adding a Search Bar is not enough, it should always be ready to help customers and reliable according to the theme of your blog. Blogger also provides Officially Simple widget for it, but that doesn't provide the professional, stylish look to your blog, but you can use CSS to Style blogspot official search box widget. If your old Search box is not working properly and you want to replace it with beautiful one don't worry, just pick up one of the following and follow the steps by step instructions below. The look of the design is up to you, you can also edit the CSS according to your blog needs.
Benefits of Adding Custom Stylish Search Box
- Add professional looks to your website.
- Provide basic benefits to customers.
- Save user time.
- Can be applied anywhere like in header, sidebar, footer etc.
- Stylish Active,hover and focus effects.
- Pure CSS, no image.
- Easy customization from CSS styles.
- Automatically adjust width.

<style type="text/css">
    #hbz-searchbox {
        background-color: #F5F5F5;
        border: 1px solid #EDEDED;
        padding: 5px;
        border-radius: 10px;
        margin: 10px auto;
        min-width: 238px;
        max-width: 288px;
    }

    #hbz-input {
        background-color: #FEFEFE;
        border: medium none;
        font: 12px/12px "HelveticaNeue", Helvetica, Arial, sans-serif;
        margin-right: 2%;
        padding: 4%;
        box-shadow: 2px 1px 4px #999999 inset;
        border-radius: 9px;
        width: 60.33%;
    }

    #hbz-input:focus {
        outline: medium none;
        box-shadow: 1px 1px 4px #0D76BE inset;
    }

    #hbz-submit {
        background: transparent linear-gradient(to bottom, #34ADEC 0%, #2691DC 100%) repeat;
        border-radius: 9px;
        border: medium none;
        color: #FFF;
        cursor: pointer;
        font: 13px/13px "HelveticaNeue", Helvetica, Arial, sans-serif;
        padding: 4%;
        width: 28%;
    }

    #hbz-submit:hover {
        background: transparent linear-gradient(to bottom, #2691DC 0%, #34ADEC 100%) repeat;
    }
</style>

<form id="hbz-searchbox" action="/search" method="get">
    <input type="text" id="hbz-input" name="q" placeholder="Type Here..." />
    <input type="hidden" name="max-results" value="8" />
    <input id="hbz-submit" type="submit" value="Search" />
</form>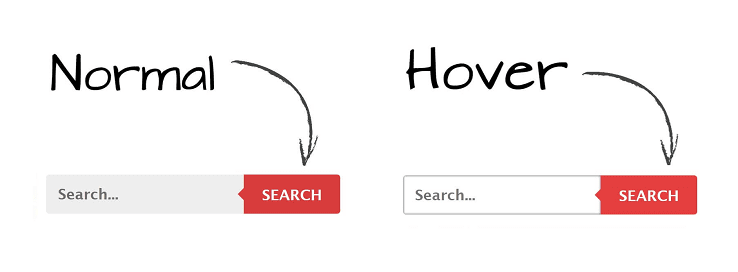
<style type="text/css">
    #hbz-searchbox {
        min-width: 250px;
        margin: 10px auto;
        border-radius: 3px;
        overflow: hidden;
        max-width: 300px;
    }

    #hbz-input {
        width: 59.2%;
        padding: 10.5px 4%;
        font: bold 15px "lucida sans", "trebuchet MS", "Tahoma";
        border: none;
        background-color: #EEE;
    }

    #hbz-input:focus {
        outline: none;
        background-color: #FFF;
        box-shadow: 0 0 2px #333333 inset;
    }

    #hbz-submit {
        overflow: visible;
        position: relative;
        float: right;
        border: none;
        padding: 0;
        cursor: pointer;
        height: 40px;
        width: 32.8%;
        font: bold 15px/40px "lucida sans", "trebuchet MS", "Tahoma";
        color: #FFF;
        text-transform: uppercase;
        background-color: #D83C3C;
    }

    #hbz-submit::before {
        content: "";
        position: absolute;
        border-width: 8px;
        border-style: solid solid solid none;
        border-color: transparent #D83C3C;
        top: 12px;
        left: -6px;
    }

    #hbz-submit:focus,
    #hbz-submit:active {
        background-color: #C42F2F;
        outline: none;
    }

    #hbz-submit:focus::before,
    #hbz-submit:active::before {
        border-color: transparent #C42F2F;
    }

    #hbz-submit:hover {
        background-color: #E54040;
    }

    #hbz-submit:hover::before {
        border-color: transparent #E54040;
}
</style>

<form id="hbz-searchbox" action="/search" method="get">
    <input type="text" id="hbz-input" name="q" placeholder="Search..." />
    <input type="hidden" name="max-results" value="8" />
    <button id="hbz-submit" type="submit">Search</button>
</form>
<style type="text/css">
    #hbz-searchbox {
        background: transparent linear-gradient(#2C2C2C, #111);
        border-width: 1px;
        border-style: solid;
        border-color: #000;
        border-radius: 4px;
        padding: 10px;
        z-index: 1;
        display: block;
        margin: 10px auto;
        min-width: 228px;
        max-width: 278px;
    }

    #hbz-input,
    .hbz-submit {
        box-shadow: 0 2px #000;
        font-family: 'Cabin', helvetica, arial, sans-serif !important;
        margin: 0px;
        padding: 0px;
    }

    #hbz-input {
        background: linear-gradient(#333, #222);
        border: 1px solid #444;
        color: #888;
        display: block;
        float: left;
        font-size: 13px;
        height: 30px;
        padding-left: 4%;
        padding-right: 4%;
        width: 60.2%;
        border-radius: 3px 0px 0px 3px;
    }

    #hbz-input:focus {
        animation: glow 800ms ease-out infinite alternate;
        border-color: #393;
        color: #efe;
        outline: none;
    }

    .hbz-submit {
        background: linear-gradient(#333, #222);
        box-sizing: content-box;
        border: 1px solid #444;
        border-left-color: #000;
        color: #fff;
        display: block;
        font-size: 12px;
        height: 30px;
        line-height: 30px;
        position: relative;
        width: 30%;
        cursor: pointer;
        border-radius: 0px 3px 3px 0px;
    }

    .hbz-submit:hover,
    .hbz-submit:focus {
        background: linear-gradient(#393939, #292929);
    }

    .hbz-submit:hover,
    .hbz-submit:focus {
        color: #5f5;
        outline: none;
    }

    .hbz-submit:active {
        top: 1px;
    }

    @keyframes glow {
        0% {
            border-color: #393;
            box-shadow: 0 2px #000, 0px 0px 5px #3DAD3D, inset 0px 0px 5px #1F391F;
        }
        100% {
            border-color: #6f6;
            box-shadow: 0 2px #000, 0px 0px 8px #6bab6b, inset 0px 0px 10px #1F391F;
</style>

<form id="hbz-searchbox" action="/search" method="get">
    <input type="text" id="hbz-input" name="q" placeholder="Search..." />
    <input type="hidden" name="max-results" value="8" />
    <button class="hbz-submit" type="submit">Search</button>
</form>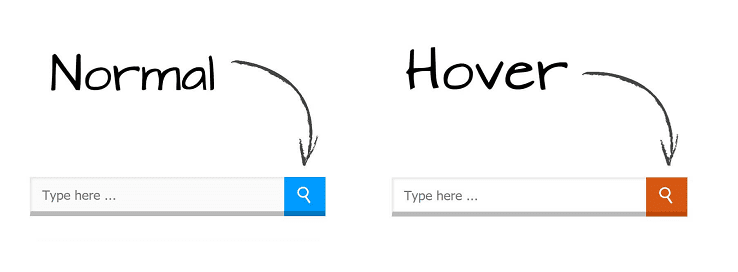
<style type="text/css">
    #hbz-searchbox {
        height: 40px;
        position: relative;
        min-width: 250px;
        max-width: 300px;
        margin: 10px auto;
    }

    .hbz-buttonwrap {
        border: none;
        width: 14%;
        height: 35px;
        display: block;
        position: absolute;
        top: 0;
        right: 0;
        background: #009bff;
        cursor: pointer;
        border-bottom: 5px solid #0276c1;
    }

    .hbz-buttonwrap:hover {
        border-bottom: 5px solid #bc490a;
        background: #d75813;
    }

    .hbz-submit {
        width: 35px;
        height: 35px;
        background: transparent;
        cursor: pointer;
        position: absolute;
        right: 50%;
        top: 50%;
        margin-top: -17.5px;
        margin-right: -17.5px;
        border: none;
    }

    .hbz-submit:after {
        content: '';
        position: absolute;
        width: 8px;
        height: 8px;
        border: 2px solid white;
        border-radius: 50%;
        left: 10px;
        top: 9px;
        box-sizing: content-box;
    }

    .hbz-submit:before {
        content: '';
        position: absolute;
        height: 8px;
        width: 2px;
        background: white;
        transform: rotate(-35deg);
        top: 19px;
        left: 21px;
    }

    #hbz-input {
        height: 32px;
        width: 82%;
        position: absolute;
        padding-left: 4%;
        border: none;
        outline: none;
        right: 14%;
        border-bottom: 5px solid #bbb;
        border-left: 1px solid #eaeaea;
        background-color: #fbfbfb;
        border-top: 1px solid #eaeaea;
        box-shadow: 1px 1px 2px #e9e4e4 inset;
    }

    #hbz-input:focus,
    #hbz-input:active {
        background-color: #fff;
    }
</style>

<form action="/search" id="hbz-searchbox" method="get">
    <span class="hbz-buttonwrap"><button class="hbz-submit" value="" type="submit"></button></span>
    <input type="text" name="q" id="hbz-input" placeholder="Type here ..." />
    <input type="hidden" name="max-results" value="8" />
</form>
<style type="text/css">
    #hbz-searchbox {
        height: 35px;
        margin: 10px auto;
        position: relative;
        min-width: 250px;
        max-width: 300px;
    }

    .hbz-buttonwrap {
        border: none;
        width: 14%;
        height: 35px;
        display: block;
        position: absolute;
        top: 0;
        right: 0;
        background: #444;
        cursor: pointer;
        border-top-right-radius: 5px;
        border-bottom-right-radius: 5px;
    }

    .hbz-buttonwrap:hover {
        background: #1a1a1a;
    }

    .hbz-submit {
        width: 35px;
        height: 35px;
        background: transparent;
        cursor: pointer;
        position: absolute;
        right: 50%;
        top: 50%;
        margin-top: -17.5px;
        margin-right: -17.5px;
        border: none;
    }

    .hbz-submit:after {
        content: '';
        position: absolute;
        width: 8px;
        height: 8px;
        border: 2px solid white;
        border-radius: 50%;
        left: 10px;
        top: 9px;
        box-sizing: content-box;
    }

    .hbz-submit:before {
        content: '';
        position: absolute;
        height: 8px;
        width: 2px;
        background: white;
        transform: rotate(-35deg);
        top: 19px;
        left: 21px;
    }

    #hbz-input {
        height: 35px;
        width: 82%;
        padding: 0px;
        padding-left: 4%;
        border: none;
        outline: none;
        position: absolute;
        right: 14%;
        box-shadow: inset 0 2px 2px #080808;
        background-color: #444444;
        color: #fff;
        border-top-left-radius: 5px;
        border-bottom-left-radius: 5px;
        transition: all 0.5s;
    }

    #hbz-input:hover,
    #hbz-input:focus {
        box-shadow: inset 1px 1px 10px #000;
    }
</style>

<form action="/search" id="hbz-searchbox" method="get">
    <span class="hbz-buttonwrap"><button class="hbz-submit" value="" type="submit"></button></span>
    <input type="text" name="q" id="hbz-input" placeholder="Search..." />
    <input type="hidden" name="max-results" value="8" />
</form>
Steps: How To Add Stylish Search Box Widget To Blogger
Note: Minimum sidebar width required - 250px
Step 1. Login to your Blogger account, then go to Layout > click on the 'Add a gadget' link on the left side.
Step 2. Choose HTML/JavaScript from the pop-up window > paste the code inside the empty box.

Step 3. Configuration:
- Change the value="8" for total numbers of posts per page. Eg value="12".
Note: Make sure max-results value matches with your post limit on homepage.
Done !
Now your visitors can navigate your blog easily. For any issues related to above tutorial Please Comment Below. Stay Updated, Browse Howbloggerz ! :)