Ad Section

Welcome To Hax One Developers | Official Website Premium Themes | Software

Description of Blog.

Social Media Brain Mapping With Digital Marketing | Experts Round Up

Social Media Brain Mapping With Digital Marketing | Experts Round Up

WordPress Ecommerce Definite Guide 2018 | Updated

WordPress Ecommerce Definite Guide 2018 | Updated

Microsoft Ready To Invest 1 Billion $ In Hololens | CNN News

Microsoft Ready To Invest 1 Billion $ In Hololens | CNN News

The Perfect SEO Guide Of 2017 That Actually Works | WordPress

The Perfect SEO Guide Of 2017 That Actually Works | WordPress

Facebook Is Releasing Some New Features In 2018

Facebook Is Releasing Some New Features In 2018

Sunday 28 April 2019

5 Stylish Search Boxes For Blogger (With Demo)

5 Stylish Search Boxes For Blogger (With Demo)

5 Stylish Search Boxes For Blogger (With Demo) Premium Blogger Styles
Search boxes for blogger
Search Box is the basic but a necessary part of a website. They're user convenient and help you in increasing your website usability. They help your readers to navigate throughout your blog more efficiently. You would see that every blogspot blogger has different stylish custom search box widget matching their template design because, they were not only help users to find the solution of their problems more easily but also add a professional look to your blog.

Whereas Web crawlers like Google can crawl your entire site easily to index all of your posts and pages, visitors have only access to the links that are in front of them. You may have hundreds or more posts/pages for people to read. You may have a different category, labels, tag, related posts, etc. listed on each of your pages, but you cannot provide all of your data in a single page. For people to find what they are looking for, they need to be able to search through your entire content quickly and easily.
Whichever page a visitor lands on, they can search for what they want. This allows people to get access to some of your hidden content that would take much longer to find by clicking through countless pages or posts. The easier it is for people to navigate your whole blog, the more likely they will stay and visit again as they can switch away to another, increasing your bounce rate.

Custom Search Boxes For Blogger

Just adding a Search Bar is not enough, it should always be ready to help customers and reliable according to the theme of your blog. Blogger also provides Officially Simple widget for it, but that doesn't provide the professional, stylish look to your blog, but you can use CSS to Style blogspot official search box widget. If your old Search box is not working properly and you want to replace it with beautiful one don't worry, just pick up one of the following and follow the steps by step instructions below. The look of the design is up to you, you can also edit the CSS according to your blog needs.
Benefits of Adding Custom Stylish Search Box
  • Add professional looks to your website.
  • Provide basic benefits to customers.
  • Save user time.
  • Can be applied anywhere like in header, sidebar, footer etc.
  • Stylish Active,hover and focus effects.
  • Pure CSS, no image.
  • Easy customization from CSS styles.
  • Automatically adjust width.
Custom Beautiful Stylish Blue Grey Search box widget
<style type="text/css">
    #hbz-searchbox {
        background-color: #F5F5F5;
        border: 1px solid #EDEDED;
        padding: 5px;
        border-radius: 10px;
        margin: 10px auto;
        min-width: 238px;
        max-width: 288px;
    }
   
    #hbz-input {
        background-color: #FEFEFE;
        border: medium none;
        font: 12px/12px "HelveticaNeue", Helvetica, Arial, sans-serif;
        margin-right: 2%;
        padding: 4%;
        box-shadow: 2px 1px 4px #999999 inset;
        border-radius: 9px;
        width: 60.33%;
    }
   
    #hbz-input:focus {
        outline: medium none;
        box-shadow: 1px 1px 4px #0D76BE inset;
    }
   
    #hbz-submit {
        background: transparent linear-gradient(to bottom, #34ADEC 0%, #2691DC 100%) repeat;
        border-radius: 9px;
        border: medium none;
        color: #FFF;
        cursor: pointer;
        font: 13px/13px "HelveticaNeue", Helvetica, Arial, sans-serif;
        padding: 4%;
        width: 28%;
    }
   
    #hbz-submit:hover {
        background: transparent linear-gradient(to bottom, #2691DC 0%, #34ADEC 100%) repeat;
    }
</style>

<form id="hbz-searchbox" action="/search" method="get">
    <input type="text" id="hbz-input" name="q" placeholder="Type Here..." />
    <input type="hidden" name="max-results" value="8" />
    <input id="hbz-submit" type="submit" value="Search" />
</form>
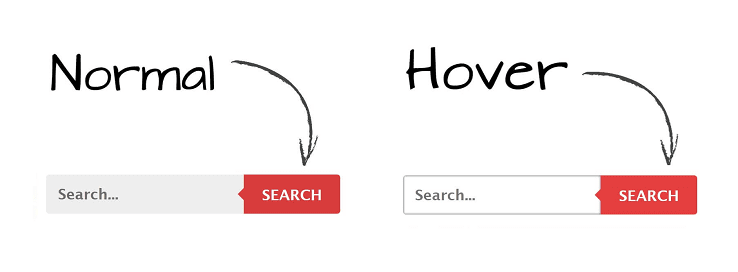
Beautiful Stylish Red Grey Search box widget
<style type="text/css">
    #hbz-searchbox {
        min-width: 250px;
        margin: 10px auto;
        border-radius: 3px;
        overflow: hidden;
        max-width: 300px;
    }
   
    #hbz-input {
        width: 59.2%;
        padding: 10.5px 4%;
        font: bold 15px "lucida sans", "trebuchet MS", "Tahoma";
        border: none;
        background-color: #EEE;
    }
   
    #hbz-input:focus {
        outline: none;
        background-color: #FFF;
        box-shadow: 0 0 2px #333333 inset;
    }
   
    #hbz-submit {
        overflow: visible;
        position: relative;
        float: right;
        border: none;
        padding: 0;
        cursor: pointer;
        height: 40px;
        width: 32.8%;
        font: bold 15px/40px "lucida sans", "trebuchet MS", "Tahoma";
        color: #FFF;
        text-transform: uppercase;
        background-color: #D83C3C;
    }
   
    #hbz-submit::before {
        content: "";
        position: absolute;
        border-width: 8px;
        border-style: solid solid solid none;
        border-color: transparent #D83C3C;
        top: 12px;
        left: -6px;
    }
   
    #hbz-submit:focus,
    #hbz-submit:active {
        background-color: #C42F2F;
        outline: none;
    }

    #hbz-submit:focus::before,
    #hbz-submit:active::before {
        border-color: transparent #C42F2F;
    }

    #hbz-submit:hover {
        background-color: #E54040;
    }

    #hbz-submit:hover::before {
        border-color: transparent #E54040;
}
</style>

<form id="hbz-searchbox" action="/search" method="get">
    <input type="text" id="hbz-input" name="q" placeholder="Search..." />
    <input type="hidden" name="max-results" value="8" />
    <button id="hbz-submit" type="submit">Search</button>
</form>
Animated Green color Stylish Search box widget
<style type="text/css">
    #hbz-searchbox {
        background: transparent linear-gradient(#2C2C2C, #111);
        border-width: 1px;
        border-style: solid;
        border-color: #000;
        border-radius: 4px;
        padding: 10px;
        z-index: 1;
        display: block;
        margin: 10px auto;
        min-width: 228px;
        max-width: 278px;
    }
   
    #hbz-input,
    .hbz-submit {
        box-shadow: 0 2px #000;
        font-family: 'Cabin', helvetica, arial, sans-serif !important;
        margin: 0px;
        padding: 0px;
    }
   
    #hbz-input {
        background: linear-gradient(#333, #222);
        border: 1px solid #444;
        color: #888;
        display: block;
        float: left;
        font-size: 13px;
        height: 30px;
        padding-left: 4%;
        padding-right: 4%;
        width: 60.2%;
        border-radius: 3px 0px 0px 3px;
    }
   
    #hbz-input:focus {
        animation: glow 800ms ease-out infinite alternate;
        border-color: #393;
        color: #efe;
        outline: none;
    }
   
    .hbz-submit {
        background: linear-gradient(#333, #222);
        box-sizing: content-box;
        border: 1px solid #444;
        border-left-color: #000;
        color: #fff;
        display: block;
        font-size: 12px;
        height: 30px;
        line-height: 30px;
        position: relative;
        width: 30%;
        cursor: pointer;
        border-radius: 0px 3px 3px 0px;
    }
   
    .hbz-submit:hover,
    .hbz-submit:focus {
        background: linear-gradient(#393939, #292929);
    }
   
    .hbz-submit:hover,
    .hbz-submit:focus {
        color: #5f5;
        outline: none;
    }
   
    .hbz-submit:active {
        top: 1px;
    }
   
    @keyframes glow {
        0% {
            border-color: #393;
            box-shadow: 0 2px #000, 0px 0px 5px #3DAD3D, inset 0px 0px 5px #1F391F;
        }
        100% {
            border-color: #6f6;
            box-shadow: 0 2px #000, 0px 0px 8px #6bab6b, inset 0px 0px 10px #1F391F;
</style>

<form id="hbz-searchbox" action="/search" method="get">
    <input type="text" id="hbz-input" name="q" placeholder="Search..." />
    <input type="hidden" name="max-results" value="8" />
    <button class="hbz-submit" type="submit">Search</button>
</form>
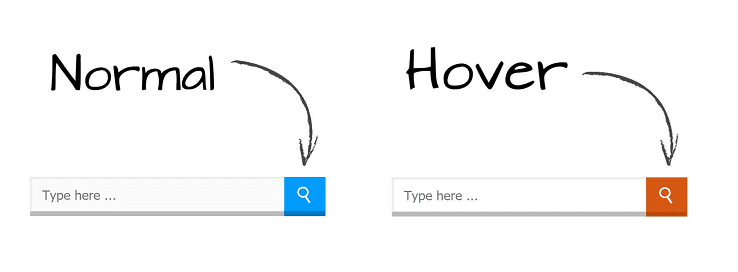
Custom Stylish Search box widget with hover effect
<style type="text/css">
    #hbz-searchbox {
        height: 40px;
        position: relative;
        min-width: 250px;
        max-width: 300px;
        margin: 10px auto;
    }
   
    .hbz-buttonwrap {
        border: none;
        width: 14%;
        height: 35px;
        display: block;
        position: absolute;
        top: 0;
        right: 0;
        background: #009bff;
        cursor: pointer;
        border-bottom: 5px solid #0276c1;
    }
   
    .hbz-buttonwrap:hover {
        border-bottom: 5px solid #bc490a;
        background: #d75813;
    }
   
    .hbz-submit {
        width: 35px;
        height: 35px;
        background: transparent;
        cursor: pointer;
        position: absolute;
        right: 50%;
        top: 50%;
        margin-top: -17.5px;
        margin-right: -17.5px;
        border: none;
    }
   
    .hbz-submit:after {
        content: '';
        position: absolute;
        width: 8px;
        height: 8px;
        border: 2px solid white;
        border-radius: 50%;
        left: 10px;
        top: 9px;
        box-sizing: content-box;
    }
   
    .hbz-submit:before {
        content: '';
        position: absolute;
        height: 8px;
        width: 2px;
        background: white;
        transform: rotate(-35deg);
        top: 19px;
        left: 21px;
    }
   
    #hbz-input {
        height: 32px;
        width: 82%;
        position: absolute;
        padding-left: 4%;
        border: none;
        outline: none;
        right: 14%;
        border-bottom: 5px solid #bbb;
        border-left: 1px solid #eaeaea;
        background-color: #fbfbfb;
        border-top: 1px solid #eaeaea;
        box-shadow: 1px 1px 2px #e9e4e4 inset;
    }
   
    #hbz-input:focus,
    #hbz-input:active {
        background-color: #fff;
    }
</style>

<form action="/search" id="hbz-searchbox" method="get">
    <span class="hbz-buttonwrap"><button class="hbz-submit" value="" type="submit"></button></span>
    <input type="text" name="q" id="hbz-input" placeholder="Type here ..." />
    <input type="hidden" name="max-results" value="8" />
</form>
beautiful Smooth Stylish Search box widget
<style type="text/css">
    #hbz-searchbox {
        height: 35px;
        margin: 10px auto;
        position: relative;
        min-width: 250px;
        max-width: 300px;
    }
   
    .hbz-buttonwrap {
        border: none;
        width: 14%;
        height: 35px;
        display: block;
        position: absolute;
        top: 0;
        right: 0;
        background: #444;
        cursor: pointer;
        border-top-right-radius: 5px;
        border-bottom-right-radius: 5px;
    }
   
    .hbz-buttonwrap:hover {
        background: #1a1a1a;
    }
   
    .hbz-submit {
        width: 35px;
        height: 35px;
        background: transparent;
        cursor: pointer;
        position: absolute;
        right: 50%;
        top: 50%;
        margin-top: -17.5px;
        margin-right: -17.5px;
        border: none;
    }
   
    .hbz-submit:after {
        content: '';
        position: absolute;
        width: 8px;
        height: 8px;
        border: 2px solid white;
        border-radius: 50%;
        left: 10px;
        top: 9px;
        box-sizing: content-box;
    }
   
    .hbz-submit:before {
        content: '';
        position: absolute;
        height: 8px;
        width: 2px;
        background: white;
        transform: rotate(-35deg);
        top: 19px;
        left: 21px;
    }
   
    #hbz-input {
        height: 35px;
        width: 82%;
        padding: 0px;
        padding-left: 4%;
        border: none;
        outline: none;
        position: absolute;
        right: 14%;
        box-shadow: inset 0 2px 2px #080808;
        background-color: #444444;
        color: #fff;
        border-top-left-radius: 5px;
        border-bottom-left-radius: 5px;
        transition: all 0.5s;
    }
   
    #hbz-input:hover,
    #hbz-input:focus {
        box-shadow: inset 1px 1px 10px #000;
    }
</style>

<form action="/search" id="hbz-searchbox" method="get">
    <span class="hbz-buttonwrap"><button class="hbz-submit" value="" type="submit"></button></span>
    <input type="text" name="q" id="hbz-input" placeholder="Search..." />
    <input type="hidden" name="max-results" value="8" />
</form>

Steps: How To Add Stylish Search Box Widget To Blogger

Note: Minimum sidebar width required - 250px
Step 1. Login to your Blogger account, then go to Layout > click on the 'Add a gadget' link on the left side.
Step 2. Choose HTML/JavaScript from the pop-up window > paste the code inside the empty box.
onhover image zoom iconAdd HTML/JavaScript widget
Step 3. Configuration:
- Change the value="8" for total numbers of posts per page. Eg value="12".
Note: Make sure max-results value matches with your post limit on homepage.
Done !
Now your visitors can navigate your blog easily. For any issues related to above tutorial Please Comment Below. Stay Updated, Browse Howbloggerz ! :)

SnapTube Vip 4.63.0.4634810 Apk

SnapTube Vip 4.63.0.4634810 Apk


SnapTube Vip 4.63.0.4634810 Apk
This app has several search options, including a catalog with 11 subcategories, a section for popular videos, a section for videos with the most views, plus another with daily recommendations.
Browsing is as simple as clicking any category or video or typing the name of the artist or song in the search bar. Once you find what you’re looking for, you can play the video or download it directly to your device.
You can choose the quality of the download to save space on your phone’s memory. You can also choose to download only the audio, which is useful when you just want to save a song or an album. Recent updates also allow the download of Facebook and Instagram.
App Info:
App name : Snaptube
Package Name : com.snaptube.premium
Apk Md5 : 99a6fddf20a690da5be72fbbc4044bc3
Apk Size : 11.94 MB
Updated : 22 April 2018
Version Name & Code:4.63.0.4634110(4634110)

Tuesday 23 April 2019

Helvetica - Responsive Clean Premium Blogger Template

Helvetica - Responsive Clean Premium Blogger Template


Helvetica is a professional responsive blogger template. Its simple design can be fully customized with the blogger's own standard tools. Helvetica is also optimized and very lightweight, which makes it deliver better results than the vast majority of the modern blogger templates currently available.

Helvetica can also be very important when talking about making money from Adsense. By having several strategic areas for ads, such as native in-feed ads for the blogger himself, and also having ads that can be added within the post via shortcodes.

Where can Niche use Helvetica? In every niche! That's right. Because it is fully customizable you can change colors, fonts, backgrounds. In other words, you can create various designs that fit into any content in your blog.

Demo


Download

Invento Premium Responsive All-in-one Blogger and Blogspot Template

Invento Premium Responsive All-in-one Blogger and Blogspot Template

Invento Responsive All-in-one Blogger Theme

Download Invento Responsive All-in-one Blogger and Blogspot Template

Invento is All-in-one, Multipurpose, OnePage and Responsive Blogger Template. This Blogger template is fully responsive and easily customizable. It is perfect if you like a clean Design. This Blogger template is 100% SEO Friendly. 

Demo
http://invento-templateclue.blogspot.com/

Download
https://www.mediafire.com/download/au7leylazpqcmx6

Monday 22 April 2019

How To Set Up A Third Party Url For Your Blogger

How To Set Up A Third Party Url For Your Blogger


Most of the people will start with their blog/website with free BlogSpot. Also, you get unlimited storage and bandwidth for your website. Technically storage is not completely unlimited, but we have other options to play with to overcome this storage.
And Blogspot will have the domain like yourblog.blogspot.com. So why we need to have a custom domain?. Usually, Blogspot is often overrun by spammers.
  • Usually, Blogspot is often overrun by spammers.
  • When you present your domain in social media, its is better to have a domain name.
  • When talking about credibility most websites don’t like Blogspot links to backlink.

Complete Guide to Setup BlogSpot With your Custom Domain Name on Godaddy

First is first we should have a domain to point to blogspot.com. If you don’t have a domain, you have plenty options to buy a domain from GoDaddy(any provider) with a yearly cost of $11–15 USD. I would suggest buying .com domain instead of .info, .org. You can click here the link to go GoDaddy and buy the domain.
I assume now you have the following two things ready.
  • Blogspot website up and running
  • Access to your domain details
Adding custom domain to BlogSpot
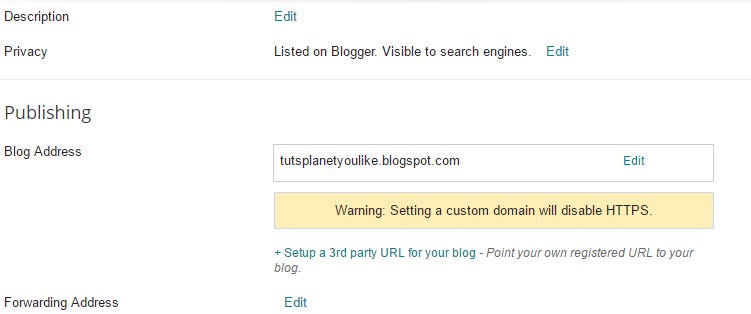
Login to the blogger.com, and select your Blogspot blog from there. Go to Settings->Basic screen. Under the Publishingsection clicks on the + Setup a 3rd party URL for your blog link.


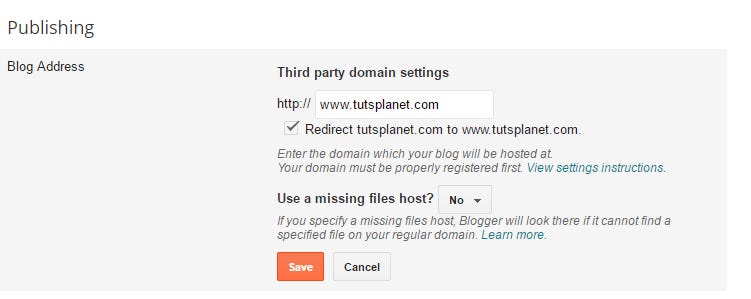
Here you have to add the domain name you purchased. Add the domain name with www address, see the below screenshot.I have added the domain name like www.tutsplanet.com. Press the Save button


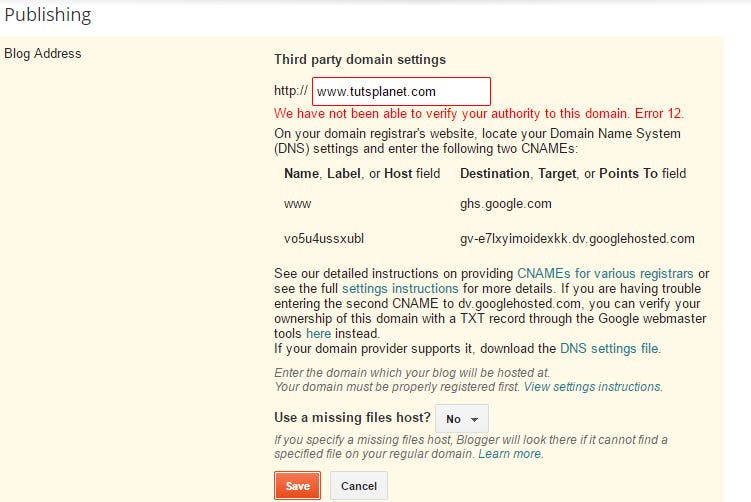
When you press the Save button, you will see an error page like below picture. The error says ” We have not been able to verify your authority to this domain. Error 12″. It means you have to configure the domain in custom domain’s control panel. The best thing Blogspot shows the CNAME that you want to update in the domain control panel. There are 2 of them as like below picture.


So you got the CNAME records, go to your domain control panel and make the changes. You can follow the below steps to do that.

Setting up CNAME and A records for the custom domain name for BlogSpot.

Login to your Godaddy account dashboard & click on manage domains. You will see a screen like this:


You will reach a listing of all your domains, click on the gear icon and the popup opens. Select the Manage DNSlink.


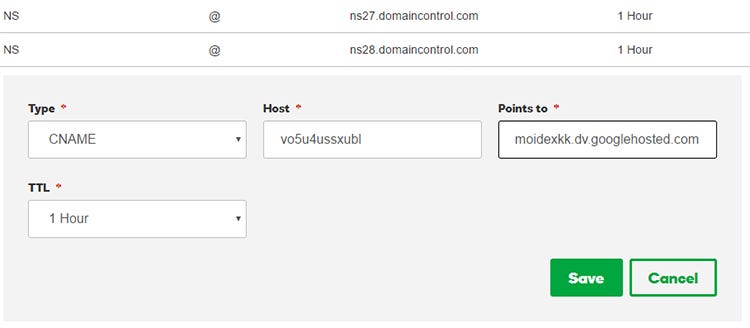
Add the CNAME you got from the BlogSpot setup page. Fill the details as like the below pictures


Click on Add another & copy the second CNAME record from your BlogSpot page:


Adding A records for the custom domain name for BlogSpot.

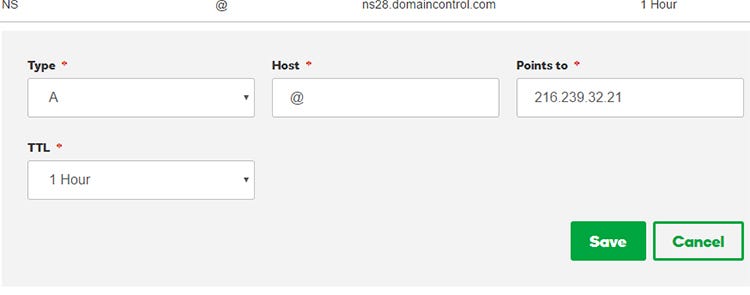
This is the last step for the setup. In this step, you have to add 4 IP address to your A record. It is same as CNAME records, instead of CNAME you have to add A record. I have added adding one A record, you can follow the same for others also.
Four IP address for google Blogspot
216.239.32.21
216.239.34.21
216.239.36.21
216.239.38.21


Just add repeat the same step for remaining 3. This will look like the below picture after you’ve added the all 4 records.


Normally this will take 30 minutes to 24 hours, to change this setting globally. But meantime you can go to Blogspot dashboard and press the save button. Now the error will disappear and it will get added properly. So you will get the screen like this.


Once you are done, then Google will take care of the redirection part. All the links work properly, you don’t want to worry about link juice.
You can do one thing, tick the Redirect without www domain to with www. You are done with setting custom domain for Google Blogspot.

Beautiful Personal Premium Blogger Template And Blogstar Premium Template Download ( Themexpose )

Beautiful Personal Premium Blogger Template And Blogstar Premium Template Download ( Themexpose )

Beautiful Template is a premium Fashion, Lifestyle and Personal Blog blogger template, tailored to your needs and to the expectations of your clients. This theme delivers many various possibilities which will help you easily create a beautiful, stunning and unique website. The theme looks great on tablets and mobile devices due to its responsive design and retina graphics. It comes loaded with various page types, wide and boxed layouts, includes unlimited color schemes, a great amount of fonts, icons and more. If you are looking for Minimalist blogger template then this is best option for you.
Beautiful - Blogger Template

DEMO

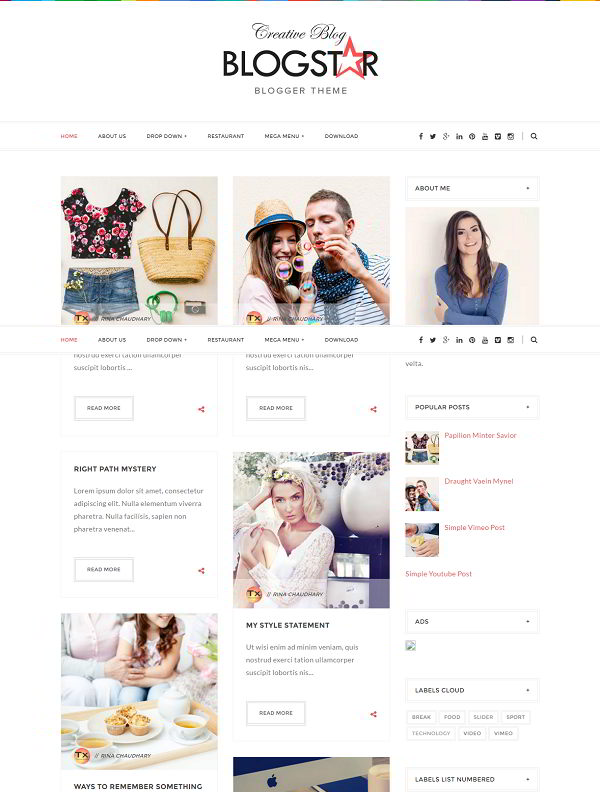
Blogstar is a light-weight, minimalist, and simple grid based blogger template. The content will stand out from the crowd with grid-based masonry design. The layout is fully made responsive that means it can load and adjust to any devices without any issue.
Blogstar theme is ideal for a gallery, magazine and personal websites. It is optimized for search engines and comes with loads of features.
Blogstar Grid Based Blogger Template
Template Features:-
  • Feature content on homepage
  • Sticky Top drop-down menu bar
  • Social share and follow buttons
  • 2 Columns grid based layout
  • 3 Columns footer
  • Mouse hover effect
  • Popular posts on sidebar
  • Recent posts with thumbnail
  • About me section
  • Threaded commenting system
  • Custom 404 page
  • SEO optimized
  • Fully responsive layout
  • Auto resize thumbnails
  • All popular browser compatible
  • Post author info
  • Right sidebar
  • Ads banner ready
  • Search box
  • Documentation included
  • Easy to use advanced admin options
                   DEMO


Download Link


HAX ONE DEVELOPERS

Hax One Developers Team Provide The Latest Premium Software, Themes, Plugins, Web Tricks, All Webmaster Premium Items Without Any Cost. Please Join Us Our Official Web https://www.haxonedevelopers.cf